tut N°12 : The eyes blazing with Photoshop
The eyes blazing with Photoshop :
Welcome to this new tutorial, in the latter we will make a great fire effect on eyes using one or two textures and a few techniques to get a beautiful rendering. And here is a preview of the final result.


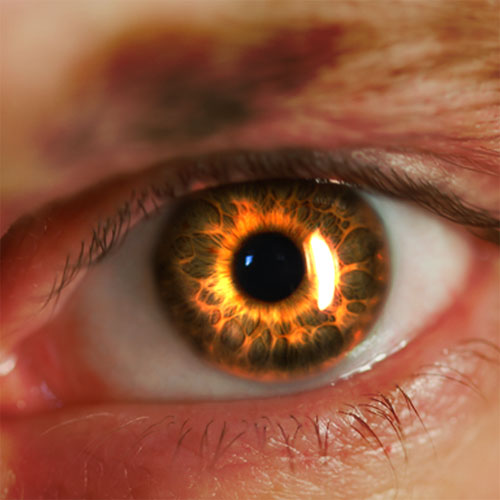


Welcome to this new tutorial, in the latter we will make a great fire effect on eyes using one or two textures and a few techniques to get a beautiful rendering. And here is a preview of the final result.
Before I start, I invite you to download the following resource pack then open a new document 1000x700 pixels, 72dpi resolution, colors RVB8bits.
Then import the next image in your document
Now we will use the density + / tool - our image and does not work directly on we will use another layer to affect the density effects.
Create a new layer (Ctrl + Shift + N) and fill it with 50% gray by pressing Shift + F5.
And change its blending mode to Overlay
After that, take the density tool - and clarify the central part of the iris
Then with the density tool + darken the edges of the iris as in the image below.
Put yourself on the first layer of your picture, take the Quick Selection tool (W) and select the entire iris
Duplicate the selection by pressing Ctrl + J and then turn over the layer 50% gray
Still with the active selection go to Menu> Filter> Blur> Gaussian Blur.
And change its blending mode to color density -
Then add a curve adjustment layer gradient transfer and put in clip by going to Menu> Layer> New Adjustment Layer> Gradient transfer curve then Menu> Layer> Create Clipping Mask. And change its blending mode to lighten
Then import the following image and adjust it as follows.
Take the eraser tool (E) and erase the part that protrudes.
And change its blending mode to Overlay
Create a new layer, take the brush tool (B), the color Orange # ff9138 opacity 20% and paint at eye level
And change its blending mode to Overlay
Then import the following texture in your document and adjust it as follows.
Then change the blending mode to lighten.
With the eraser tool (E) delete everything above
Create a new layer, take the brush tool (B) with a form to the hardness of 0% and a radius of 280 px draw an ellipse orange # ff8801.
And change its blending mode to Overlay
Then add a curve adjustment layer gradient transfer by going to Menu> Layer> New Adjustment Layer> Gradient transfer curve and change its blending mode to Hard Light.
Finally add a Levels adjustment layer by going to Menu> Layer> New Adjustment Layer> Levels.
And here is the final result
_________________________________
Written by admin
![]()


0 commentaires: